
Your Cart is Empty
Free Shipping On All Orders In July - No Coupon Code Necessary
Free Shipping On All Orders In July - No Coupon Code Necessary
Free Shipping On All Orders In July - No Coupon Code Necessary
Free Shipping On All Orders In July - No Coupon Code Necessary

October 17, 2017 5 min read
So you’re getting ready to start learning for a successful career in the fashion design. You probably have a lot of talent, you love fashion, and have a fine taste for style. However, these are simply not enough to start your career, as you need to first learn some basics. And amongst these, you also need to learn a few things about the tools, items and accessories that a real fashion designer needs to use. So it is now the right time for you to get some basic knowledge about the dress forms.
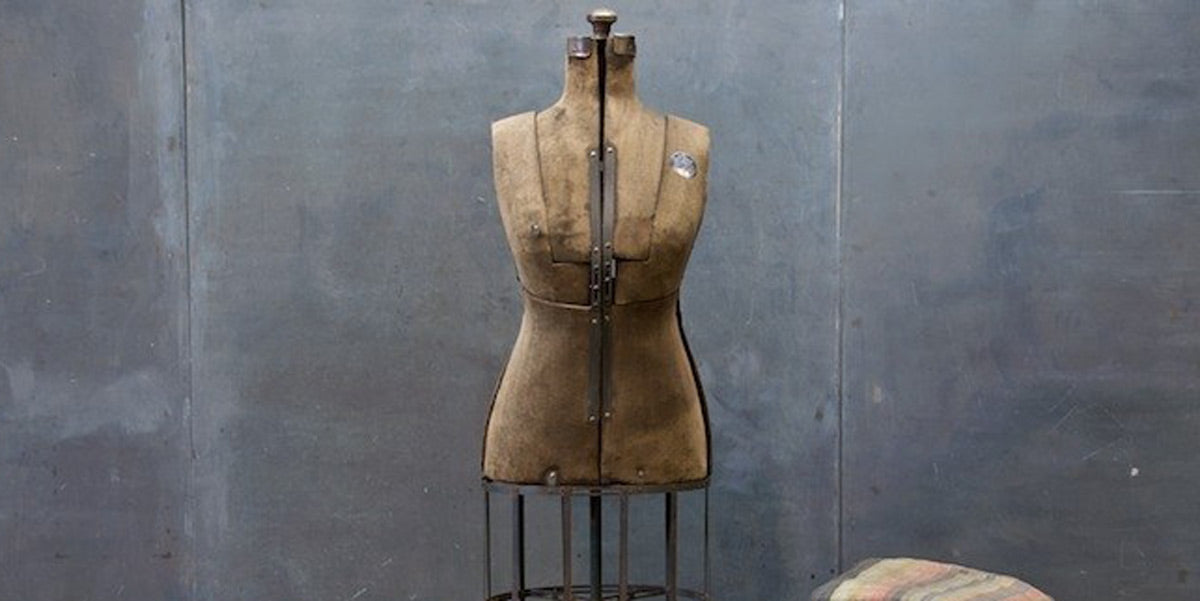
What is a dress form?
First of all, you need to know what a dress form is. Simply said, it is a three-dimensional model of the torso that is used for fitting clothing that is being designed or sewed. The dress formis excellent to use when making a piece of clothing, as it helps the designer put the piece of clothing on the dress form, to see the fit and drape of the garment, as it would appear on a real human’s body. Additionally, it also helps make adjustments and alterations to the piece of clothing.
The dress formis also referred to as Judy, which represents the female form, and James, which represents the male form.
Guide for using dress forms
In this guide, you’ll learn how to use the dress formsfor draping. But before you go on with reading this guide, it is essential to know a few things about making a pattern from a form. A pattern can be done in two ways:
For making a flat pattern, you need to take a basic flat pattern – also referred to as a sloper – and alter it to the style that you want in the flat paper form. This is done through cutting, measuring and taping. For example, let’s imagine you want to create an A-line skirt. For this, you would slash the skirt at regular intervals and then pin the pieces apart from the waist to achieve the desired result. Once this is done, you would copy it over to a new paper pattern to get the new pattern.
Draping is pattern-making, but on the contrary to the flat pattern, this is done on the form. It is useful in various pattern-making, but it is especially great to use for asymmetry, ruching, cowls, and other design elements that are hard to visualize in flat form.
There are various dress formsout there on the market, from the cheapest to the most expensive ones. There are standard dress forms, as well as adjustable ones. However, one of the main criteria that you should consider when choosing your dress formis its proportions. Therefore, it is highly recommended that you get a form that closely fits your proportions. To make sure that you get it well, you first need to thoroughly measure your body. You can always pad out your dress form, so it is recommended to get one that is either equal or smaller than your measurements. It is especially important to consider the position of your bust apex, and the back neck to waist measurement, since you won’t be able to move the bust or to shorten the torso.
Of course that the dress formis the first on your list, but this is not the only supply that you need. Some of the important supplies that you need to have include:
You first need to pad the form to fit your body. Then, you need to mark the lines of your pattern. In case your pattern is symmetrical, it is enough to only mark one side of the form.
It is needed to pin the fabric to the form and to mark the desired pattern section along the pattern lines that you created within the prior step. The purpose is to be able to replicate what you create as a flat pattern after you take it off the dress form.
You need to dot along your pattern lines, for each piece. Major points, such as the intersection with the waistline, should be lined with a notch. A notch refers to a tick mark that will be clipped upon cutting the pattern. It serves as a way to match up two pattern pieces in the right place.
Once you finished the basing draping, it is the time to take off the marked piece from the dress form. Trim all the pieces to the desired seam allowance, so you’ll easily sew them into the first draft of your clothing. After you do this, try on the garment, to see how close you got to the desired result. However, don’t worry if it doesn’t fit perfectly, as patternmaking is an iterative process.
After this first fitting round, you can start making the required alteration. For this next step, there are a few things that you should keep in mind:
You’ll probably need to try again and again, until you get everything right. You should take your first draft of a pattern, and then cut out a new set of pattern pieces for all the changes that you make.
So you made all the changes, and now you’re finally happy with the fit. Then, it is about time for you to draft a paper pattern to add it to your collection. Take the fabric you chose for the pattern and lay each pattern piece down in it with a layer of tracing paper face down in between. Take the tracing wheel and use it to trace around the outside of your pattern piece. Don’t forget to take into account any possible final alterations.
Once you finish transferring your pattern, smooth out the lines by drawing around your pattern pieces. Now, you can cut out your pattern. It is recommended to add the seam allowance, prior to cutting out your pattern.
Final words
As you can see, with the right supplies, and a few important things to have in mind, you’ll easily design your new pattern garment piece for your collection. And all this can easily be done with the help of the dress forms.